Order Today
Ships Tomorrow
Order by 5PM EST
Custom Wall Decals


Template Categories
Popular Templates


About Our Wall Decals
Description
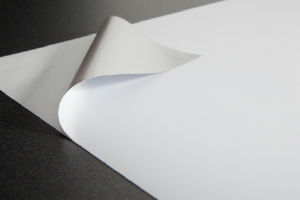
The ultimate in repositionable signage, our custom wall decals are a great option for in-store graphics, bedroom walls and office decor. Design your own decal and when you're ready to change things up, just peel your vinyl decals off the wall and stick them elsewhere or store them for future use. Our adhesive decals won't damage paint or drywall, so you can feel confident putting them up just about anywhere.
Installation & Care
Installation: Remove all residue and dirt from the wall with mild soap and water. Make sure the decals have been brought up to room temperature before installing. Install on a smooth surface by starting at the top edge of the graphic and working your way down, slowly removing the backing as you go.
Care: To clean your wall decals, gently wipe them with a damp cloth, making sure not to saturate the adhesive side with water. You can peel the decals off the wall for storage. Store them at room temperature with 50% or less humidity for up to a year. To avoid creasing, do not roll them too tightly or lay heavy objects on your decals. Wall decals can tear with excessive tension.
Wall Decal Highlights
Weight: .19lbs per square foot (about the weight of 20 quarters)
Thickness: .013" (about the thickness of 3 sheets of copy paper)
Details: Opaque white, low-tac, repositionable, easy to install
Uses: Indoor. Retail, home or office walls
Print Method: Four color process, eco-friendly, weather, fade and abrasion resistant UV ink
Estimated Lifespan: 5+ years with proper placement and care
Common Sizes: 12"x12", 24"x12", 2'x2', 4'x4', 3'x5'
Wall Decal Options
-
Cut


Image Gallery
- src=https://www.esp.com/content/assets/filelibrary/Custom-Business-Wall-Decals-273.jpg
- src=https://www.esp.com/content/assets/filelibrary/Large-Business-Wall-Decal-274.jpg
- src=https://www.esp.com/content/assets/filelibrary/Custom-Wall-Decal-275.jpg
- src=https://www.esp.com/content/assets/filelibrary/Classroom-Wall-Decal-276.jpg
- src=https://www.esp.com/content/assets/filelibrary/20150731-131639-316.jpg
- src=https://www.esp.com/content/assets/filelibrary/IMG-20150731-131715-317.jpg
- src=https://www.esp.com/content/assets/filelibrary/20150727-122833-318.jpg
- src=https://www.esp.com/content/assets/filelibrary/20150731-131258-319.jpg
- src=https://www.esp.com/content/assets/filelibrary/20150731-163316-340.jpg
- src=https://www.esp.com/content/assets/filelibrary/20150925-153203-477.jpg
- src=https://www.esp.com/content/assets/filelibrary/20150928-130129-485.jpg
Frequently Asked Questions
Product Specs
- What material are your wall decals?
- Our wall decals are made from a thin (4 mil) flexible vinyl material. The vinyl has a low-tac adhesive backing that allows you to apply and remove it as necessary from interior walls.
- Are wall decals the same as wall stickers?
- Much like our window decals there is often some confusion around the terms used when talking about wall decals. While technically a misnomer, the term wall sticker, is often used in place of wall decal. Wall sticker is incorrect due to the fact that stickers are not reusable, use a stronger adhesive and generally leave behind adhesive residue when the sticker is removed. Wall decals on the other hand can be stored and reused if done correctly, can be repositioned due to the low tac adhesive that is used and leave behind little to no residual adhesive. So while we’ll understand what you’re referring to when the term “custom wall stickers” is used, the proper term is wall decal or even wall graphic.
- What are the maximum and minimum dimensions of the custom vinyl wall decals?
- The smallest custom wall decal we can print is 4”x4”. The largest decal we can print is 52”x1798” ( 4.5’x150’). Thus, assuming you keep one dimension under the 4.5’ maximum your size options are essentially limitless. Due to the size of our printers we would recommend any wall decal that is close to the minimum size be as simple as possible. Otherwise, the clarity of the printed portions may diminish.
- Does my design or number of colors make my wall decal more expensive?
- All of our wall decals are printed in full color using a fade resistant ink. Thus, regardless of whether your wall decal has one color or many it will not increase the price of your decal. Similarly, whether your design is one solid color or a complex vector image the cost will remain the same. The price of your decal order will be determined by the size of the decal and the quantity you order. Design services are 100% free.
- Are there standard sizes of wall decals?
- To our knowledge we don’t know of any industry wide standard sizes for wall decals. They truly are one of the most custom signage solutions as they vary greatly in use and design. Notwithstanding, we do offer some common size decals including: 12"x12", 24"x12", 2'x2', 4'x4', 3'x5. Assuming you stay within the minimum and maximum dimensions the size largely depends on what you want or need it to be.
- What is the lifespan of my wall decal?
- With correct usage and proper care and maintenance your wall decal should last for 5+ years.
- Can my wall decal be a shape other than rectangular or square?
- Yes! Technically you can make your wall decal any custom shape you may want. This can be done with two different cut options. Contour cut will mean that your design is cut to the exact perimeter of your sign. Halo cut will be likewise cut to the shape of your design but leave a small white border around the perimeter. Despite the ability to cut to any shape we would forewarn against any design that includes cutting extremely narrow parts of the design. These narrow parts can tear during installation and repositioning of the decal. Thus, if your design has to include such portions, both installation and removal will need to be done with the utmost care to avoid tearing of the decal.
- Are your wall decals the same as the vinyl letters?
- No. Wall decals, even when cut to shape, are a different product than vinyl lettering or cut vinyl. Wall graphics are repositionable and cut vinyl is not. Also, vinyl lettering can either be applied individually or all at once using a mask or transfer paper, but each letter can be individual pieces. Wall decals typically come as one large graphic and we strongly discourage cutting out individual letters with this material. If you are interested in vinyl lettering please contact us to discuss this product. We offer it but it is not currently listed on our website.
- What is the default color of the wall decal material?
- If nothing were printed on the vinyl wall decal material that we use it would be white. Your design is printed on top of the blank white material. Thus, they will be opaque in nature where nothing is printed.
- Do I have to use one of your templates for my wall decal?
- While we have many existing templates across a range of categories you do not need to use one of our templates. Our online design tool allows you to design your own wall decal from scratch using a blank template or to upload a wide range of file types for pre-designed files and designs. Lastly, we also offer free design services in which we can design something for you or modify an existing design.
- Are wall decals toxic due to the adhesive they use?
- Water-based adhesive. No solvents. The low-tac adhesive property used as part of our wall decal is a water-based adhesive. There are no solvents in the adhesive property. Still we would not recommend allowing pets, kids or anyone else eat or inhale any part of the sign. This is especially true of smaller decals that may be applied in a nursery or kids’ room and fall off.
- Can the wall decals be written on with dry erase markers or otherwise?
- No. Our wall decals are not designed to be written on. Writing on your wall decal will result in either permanent stains or residual stains when you try to clean them off. There are products similar to wall deals that allow you to write on them. If you are interested in these decals please contact us for more details.
- Are the wall decals a matte or glossy finish?
- The decals have a slight matte finish to them so they aren’t shiny. Also, the printed area of your decal will be a smooth, satin, vibrant finish.
- Is there a laminate covering over the decal?
- No, your design is printed directly onto the vinyl material. No laminate covering is necessary. We use UV ink that is scratch, fade and abrasion resistant. This just means that even without a laminate overlay your decal should not scratch or smudge as long as your graphics are cared for properly.
Usage
- Will it damage the wall or surface area where it is applied?
- Our custom wall decals are completely safe to use on the interior walls of your home or business. The installation and removal of the decal shoud not peel up any paint or existing decorative aspects of your walls. As long as you follow the installation instructions as outlined below your wall decal will prove to be a versatile signage solution without the worry that it will damage your walls.
- Does it work on any surface? Does it work on exterior walls and surfaces? What about textured walls?
-
Our vinyl wall decals are intended for interior use. Any kind of exterior usage will result in a shortened lifespan and potentially a ruined product if not placed on a proper surface.
For interior use the decal will work on any smooth and non-porous surface. This includes some lightly textured walls as well as painted drywall, glass, plastic, tile, smooth metal, sealed concrete and finished wood. Extremely unsmooth, textured (stucco, brick, concrete blocks, etc.) or porous walls or materials (fabric, canvas) will not work due to the inability for the adhesive backing to stick to the surface or because air or drafts will weaken the adhesive over time.
- Can it be applied over top of wall paper?
- Generally speaking your wall decal can be applied on top of a wall paper assuming it is a smooth surface. Notwithstanding, wallpapers’ smoothness and properties can vary greatly. In some cases removing a wall decal from a wall papered room can also peel away wall paper. Thus, we would recommend avoiding applying or using wall decals on top of wallpaper.
- Will the wall decal work with any type of paint?
- Your wall decal should be fine with the most common latex and oil based paints. Paints that should be avoided are ones that are highly textured and ones with additives as that can offset the adhesive properties of the decal itself. Likewise, matte finish paints are better than semi- or high gloss paints.
- Can I apply my wall decals to a wall that has been recently painted?
- We recommend allowing the paint to completely cure before you apply your decal. Applying so sooner can result in a decal that will not stick and or paint that peels away from the wall when you remove your decal. Curing times will vary for different types of paint and circumstances (longer for more humid settings) but we would recommend waiting 2-3 weeks to be safe.
- Can I peel it off and reuse it? Is it easy to remove? Even after storage? Will it tear?
-
The wall decals are made with a low tack adhesive that allows for both removal and reuse on a regular basis. Peeling away or repositioning your decal is extremely easy and doesn’t leave behind any residual adhesive like a normal sticker would. Notwithstanding, like any sticker or adhesive the tackiness will wear with time and with frequent repositioning. The maintenance and care of the decal itself will also impact how many times it can be removed and reused. This is detailed below in the “Installation & Care” section.
If you intend to reuse your decal after storage we recommend using the original backing to store the decal. This backing will help keep the adhesive side of the decal from getting dirty or sticking to another property (or itself!) during storage. Using this original backing will allow you to remove, store and reuse your wall decal in the same position or different locations over time.
- Is there a limit to how long I can store my decal?
- Our 4 mil repositionable wall decals have a storage shelf life of more than a year when stored properly. Ideal conditions for storing are 70 degrees Fahrenheit and 50% relative humidity.
- How do I remove my decal? What if it’s been in place for a long time?
-
Simply pick a corner and peel away from the wall or surface where it is applied. If your decal has been contour cut, pay particular attention to areas where the decal is thin. Peel it up slowly and carefully in order to avoid any tearing or stretching. If you intend on storing the decal make sure to have your backing laid out before you remove the decal from the wall. Then place the decal on to the backing.
If your decal has been in place for an extended period, or on a less porous surface, you may need heat to remove it. The easiest way to do so is to use a blow dryer to heat up the decal and then peel it away.
- What are the typical uses of wall decals?
- Custom wall decals have both personal and commercial uses. Personal uses include home decor for a variety of rooms, particularly kids rooms and nurseries. Quotes and other decorative designs are also often used in living and dining rooms. Wall decals in a commercial setting can be used from everything to advertising a current sale or upcoming promotion, directing customers to certain sections of the store or for branding purposes in office settings. They also work well for designating temporary sections or areas such as clearance section in retail settings and reconfigurable areas in warehouse and manufacturing businesses.
- Does it matter what kind of environment I use my wall decals in as long as it is inside?
- Yes. It matters a great deal where you use your decals. In particular your wall decals are going to work best in environments that are cool and dry. Rooms (think bathroom or kitchen for personal use), offices or otherwise that are extremely humid, cold, wet, etc. can impact the adhesive properties of the decal. We recommend cleaning the surface and allowing it to dry before applying and ensure that the room where your decal is installed is a well ventilated one that remains close to room temperature at all times. For rooms that have some humidity, such as a kitchen or bathroom, make sure to apply to a dry surface and when the room itself is not humid.
Installation & Care
- How do I install it? Does installation require multiple people or even professional installation services?
-
The installation of your decal first requires you to clean the surface and allow it to air dry where it will be applied. Cleaning this surface of any residual dirt, grease or grime will help the decal to adhere better to the surface. Clean the surface with a mild cleaner or in most cases a rag wet with water will be sufficient. Assuming it is an appropriate surface (interior, smooth, non-porous), the decal can be peeled away from the backing and slowly applied to the surface starting at the top of the decal and working down. The key to installing your decal is to move slowly so that you can peel small portions of it back up and reapply as needed to remove any air pockets or bubbles. Please note that unlike window and car decals you should NOT spray water onto the adhesive side of a wall decal. They are installed dry due to the fact that the low-tac adhesive allows for repositioning, which is what the water does when applying the semi-permanent window decals..
For larger decals we recommend having a second person help with the installation of the graphic. This will help ensure that the decal doesn’t stick to itself and will help avoid tearing when removing the decal from the backing and while positioning it on the wall.
- How do I store it?
- In order to store the decal for an extended period you should reapply it to the original backing that comes with the decal. This will ensure that the adhesive side is protected over time and allow for easy reuse whenever you might need the decal again. Avoid storing it in any locations that may cause the decal to lose its adhesive property due to exposure to dust, extreme heat and cold, and extreme humidity.
- Do I need to clean my wall decals? If so, how?
- The non-adhesive side of the decal can be cleaned on a regular basis with a lighly damp rag or cloth. This will help keep the decal clean of any smudges or dirt and to retain it’s vibrant printing for the duration of the sign.
Your trusted, custom signage provider.


